Planting flower bulbs should be one of the simplest and most satisfying jobs in the garden. You dig a few holes, drop in the bulbs, cover them up, and wait for the magic to happen.
Yet in reality, bulb planting often turns into a slow, awkward, back-breaking chore. Spacing bulbs evenly feels tedious. Digging dozens of identical holes takes far longer than it should.
And no matter how carefully you try to measure, the finished result often looks uneven, crowded in some places and sparse in others.
That frustration is exactly why the egg carton method has become such a beloved trick among experienced gardeners. It looks almost too simple to be useful, yet once you try it, you realize it quietly solves nearly every common bulb-planting problem at once.
It gives you perfectly spaced planting spots, helps keep your depth consistent, speeds the entire process up dramatically, and produces natural-looking drifts of flowers instead of stiff, unnatural rows.
Best of all, it uses something most people already have sitting in their recycling bin.
The beauty of the egg carton method isn’t that it’s clever. It’s that it works.
Why Traditional Bulb Planting Feels So Clumsy
Most bulb planting advice relies on spacing charts and general rules like “plant tulips 4–6 inches apart” or “space crocus 2–3 inches apart.”
On paper, this sounds straightforward. In practice, it usually means guessing distances, stepping back to eyeball the spacing, digging a hole, moving it because it feels too close to the last one, then adjusting again.
The result is rarely consistent. Some bulbs end up too close together and compete for nutrients. Others are too far apart and look lonely once they bloom. Depth also becomes uneven, which leads to staggered growth and uneven flowering.
Add sore knees, tired hands, and the sheer number of holes required for a good display, and it’s no wonder many gardeners put off planting bulbs longer than they should.
The egg carton method exists because gardeners needed something simpler, faster, and more reliable.
What the Egg Carton Method Actually Is
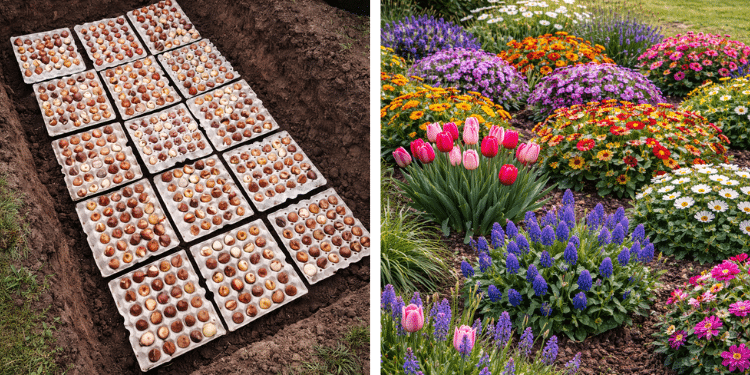
The egg carton method uses a cardboard egg carton as a spacing and hole-marking guide. Instead of measuring distances and digging holes one by one, you press the open egg carton into the soil.
Each cup leaves a clear indentation in the ground. Those indentations become your planting spots.
In a single motion, you create a grid of evenly spaced planting points. No measuring tape. No guessing. No rearranging holes. You simply follow the marks.
It’s almost absurd how effective this is.
Why It Works So Well
Egg cartons were never designed for gardening, yet they happen to solve three major bulb-planting challenges all at once.
First, the cups are naturally spaced at regular intervals, which creates uniform planting distances without measuring.
Second, the cup shape makes a visible and physical guide that shows you exactly where each hole should go. Third, cardboard grips the soil well and creates clean impressions without slipping or collapsing the way plastic cartons do.
There’s also a psychological benefit. Instead of constantly stopping to check your spacing, you move smoothly from hole to hole, which makes planting feel easier and far less tiring.
It’s one of those rare gardening tricks that feels obvious in hindsight.
Which Bulbs Work Best With the Egg Carton Method
The egg carton method shines when planting small to medium-sized bulbs that prefer close spacing.
It works beautifully for crocus, snowdrops, grape hyacinths, dwarf iris, scilla, anemone, small alliums, small tulips, mini daffodils, and fritillaria.
These bulbs naturally look best when planted in clusters, and the spacing of an egg carton aligns almost perfectly with their needs.
Larger bulbs like standard tulips, full-size daffodils, and hyacinths can still be planted using this method. You simply adapt the spacing by skipping every other indentation or using only the corner cups.
This preserves the speed and consistency of the method while giving larger bulbs the room they need.
How to Use the Egg Carton Method Step by Step
The simplicity of this method is what makes it so appealing.
Start by choosing a cardboard egg carton. Avoid plastic or foam cartons, as they don’t grip the soil well and don’t leave clean impressions. A standard twelve-egg carton works perfectly.
Next, prepare the planting area. Loosen the soil where you plan to plant your bulbs, remove rocks and weeds, and improve drainage if necessary by mixing in compost or grit. Bulbs hate soggy soil, and good drainage matters far more than rich fertility.
Open the egg carton and lay it flat with the cups facing downward. Position it exactly where you want your bulbs planted. For a natural look, angle the carton slightly instead of lining it up perfectly straight.
Press the carton into the soil using your hands or your foot. Apply firm but gentle pressure. Each cup will leave a clear indentation in the soil.
Lift the carton carefully. You’ll see a perfect pattern of evenly spaced planting spots.
Now dig a hole at each indentation using a hand trowel, bulb planter, or even your fingers. Adjust the depth based on the bulb type. A good general rule is to plant bulbs at a depth about three times their height.
Place one bulb in each hole with the pointed end facing up. If you’re unsure which end is up, plant the bulb sideways. It will correct itself.
Cover the holes with soil, press gently, and water thoroughly to settle the soil around the bulbs.
That’s it.
Why This Method Is So Much Faster
The slowest parts of bulb planting are measuring spacing, repositioning holes, and correcting mistakes. The egg carton method eliminates all three.
You create twelve perfectly spaced planting spots in seconds. Once the marks are made, you simply move down the row or across the bed digging holes and dropping in bulbs.
For large planting projects, this method can easily cut planting time in half. It also reduces physical strain because you aren’t constantly stopping, squatting, standing, and re-measuring.
Why the Results Look More Professional
Most people unknowingly plant bulbs in stiff, straight rows. Nature doesn’t grow flowers in rigid grids, and gardens look more natural when bulbs are arranged in loose drifts.
The egg carton method naturally produces soft, evenly spaced clusters. When you rotate the carton slightly between placements, you create a staggered pattern that looks organic rather than mechanical.
The result is a display that looks intentionally designed rather than hastily planted.
How to Adapt the Method for Larger Bulbs
Larger bulbs need more space, but you don’t have to abandon the method.
You can skip every other indentation, use only the corner cups, or rotate the carton and overlap placements slightly.
These small adjustments give you wider spacing while preserving the method’s speed and accuracy.
It’s far easier to modify an existing pattern than to start measuring everything from scratch.
Can You Leave the Carton in the Soil?
Some gardeners place bulbs directly into the egg carton cups, bury the entire carton, and let it decompose.
This can work for very small bulbs in loose soil. However, it’s not ideal in heavier soil or for larger bulbs. The cardboard can slow root expansion and interfere with drainage.
For best results, use the carton as a spacing guide and remove it before planting.
Why Cardboard Matters
Cardboard egg cartons grip the soil and create clean impressions. Plastic cartons slide around, crack, and don’t leave usable marks.
Cardboard is also biodegradable and environmentally friendly, making this method a sustainable gardening hack.
When to Use the Egg Carton Method
This method works for both fall and early spring bulb planting.
It’s perfect for spring-blooming bulbs like tulips, daffodils, crocus, hyacinths, and snowdrops planted in fall, and for summer-blooming bulbs like gladiolus, lilies, and dahlias planted in spring.
Any time the soil is workable, the egg carton method works beautifully.
Common Mistakes to Avoid
Even a simple method can fail if a few basics are ignored.
- Using plastic cartons instead of cardboard
- Planting bulbs too shallow
- Planting in soggy soil
- Not improving drainage in heavy clay
- Using the same spacing for all bulb sizes
- Forgetting to water after planting
Fixing these small issues makes a dramatic difference.
Why Professional Gardeners Love This Trick
Landscape designers use spacing grids and layout templates to achieve uniform planting. The egg carton method replicates those tools using household waste.
It delivers professional-looking results without professional equipment. That’s why this trick spreads so quickly among experienced gardeners.
Why It’s Perfect for Beginners
New gardeners struggle most with spacing and depth. The egg carton method removes both problems.
It turns bulb planting into a simple, foolproof process. Even first-time gardeners get evenly spaced, natural-looking results.
Does It Work for Vegetables Too?
Yes. The egg carton method also works for planting onions, garlic, shallots, and small seed potatoes. It can even be used as a biodegradable seed-starting tray.
It’s far more versatile than it first appears.
The egg carton method transforms bulb planting from a slow, frustrating chore into a fast, precise, and almost effortless task.