Imagine transforming your kitchen scraps into a sustainable source of fresh produce. Not only does this reduce waste, but it also provides a cost-effective way to enjoy a continuous supply of fresh greens and herbs. For instance, the base of a romaine lettuce or the root end of a green onion can be regrown into a new plant. This process requires minimal effort and resources, making it accessible to anyone with a sunny windowsill. By reusing scraps, you can save money on groceries while contributing to a more sustainable lifestyle. According to a study, households waste approximately 30% of their food, highlighting the importance of finding creative solutions to reduce this number.
Regrowing plants from scraps is also a fantastic educational tool for children, teaching them about plant biology and sustainability. By involving kids in the regrowing process, you can spark a lifelong interest in gardening and environmental responsibility.
Introduction: Why Windowsill Water Jars Are Having a Moment
Windowsill water jars have surged in popularity due to their simplicity and effectiveness. They offer an ideal way to propagate plants without the need for soil or extensive gardening experience. All you need is a clear jar, some water, and a bright windowsill. The transparency of the jar allows you to observe the root growth, making it a visually rewarding experience. This method also requires less space compared to traditional gardening, making it perfect for urban dwellers or those with limited outdoor space.
Moreover, this trend aligns with the growing interest in home decor and indoor gardening, as displayed plants can enhance the aesthetic of a home. The combination of functionality and decoration makes windowsill water jars an appealing choice for many.
1. How Regrowing From Scraps Works (And What to Expect)
Regrowing plants from scraps involves using parts of the plant that are typically discarded, such as the base, roots, or pits. These parts contain the necessary cells to regenerate new growth, provided they have the right conditions. In water, these scraps absorb moisture and nutrients, promoting root and shoot development. Most vegetables and herbs will show signs of new growth within a week, although this can vary depending on the plant species and environmental conditions.
It’s important to note that while regrowing plants from scraps is effective, the resulting plants may not always reach the size or quality of commercially grown produce. However, they still offer fresh, edible greens and herbs that can supplement your diet.
2. Setting Up Your Windowsill Jar Station for Success
To set up your windowsill jar station, select a sunny windowsill where the plants can receive at least 6 hours of indirect sunlight daily. Choose clear jars or glasses to allow maximum light penetration and visibility of the root growth. Ensure the jars are clean and free from any detergent residues that could harm the plants. Fill the jars with enough water to submerge the base or roots of the scraps but avoid covering any leaves, as this can lead to rot. Change the water every few days to prevent stagnation and algae growth, and rinse the plant base with fresh water to keep it clean.
Label each jar with the plant type and date to track its progress. You can also use decorative jars to enhance the aesthetic appeal of your windowsill garden.
3. Lettuce, Bok Choy, and Cabbage: The Viral Regrow-From-Base Hack
To regrow lettuce, bok choy, or cabbage, save the base or bottom 1-2 inches of the plant. Place it in a shallow jar with enough water to cover the base. Within a few days, you’ll notice new leaves sprouting from the center. Ensure the water level is consistent and change it every few days. Typically, you can harvest new leaves within two to three weeks.
This method is particularly popular on social media platforms, where users share time-lapse videos of their regrowing progress. It’s a simple yet satisfying way to produce fresh greens from kitchen scraps.
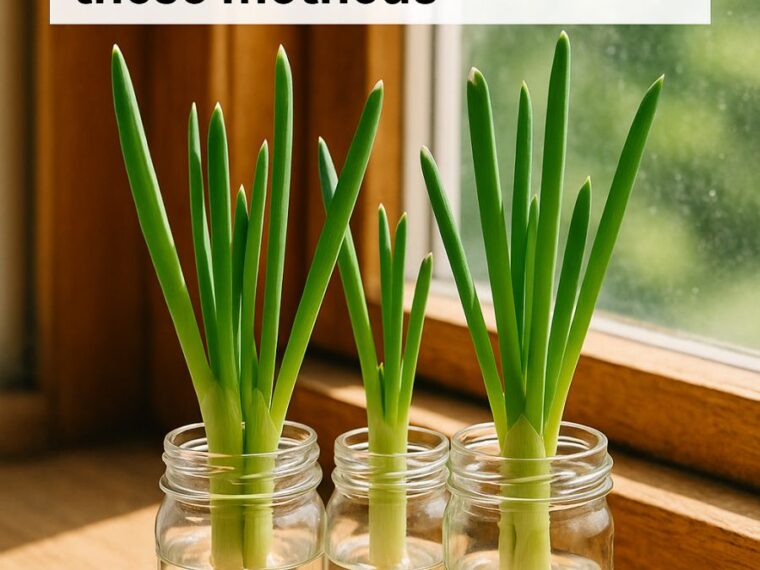
4. Endless Green Onions and Leeks From Leftover Roots
Green onions and leeks are some of the easiest vegetables to regrow. Cut the roots with about an inch of the bulb attached and place them in a jar with enough water to cover the roots. Position the jar on a sunny windowsill. You’ll see new green shoots emerging within days. Trim the greens as needed, and they will continue to regrow, offering a continuous supply of fresh flavor for your dishes.
This method not only provides fresh produce but also reduces food waste, making it a win-win for your kitchen and the environment.
5. Celery and Fennel: Regrowing Crisp Stalks in Plain Water
To regrow celery or fennel, save the bottom 2-3 inches of the stalk. Place it in a jar with water covering the base and set it on a sunny windowsill. Within a week, new leaves will start to grow from the center. As the plant develops, the outer stalks may not grow as thick as the original, but the new growth will be flavorful and crisp.
This method is particularly satisfying for those who enjoy using celery and fennel in soups, salads, or as a crunchy snack.
6. Carrot, Beet, and Radish Tops for Fresh Greens and Garnishes
While you can’t regrow the full carrot, beet, or radish from scraps, you can produce fresh greens that are excellent in salads or as garnishes. Save the top inch of the root and place it in a shallow dish with water, ensuring the top is above water. New greens will emerge within a week. Harvest them as needed, and they will continue to regrow.
These greens are rich in nutrients and add a fresh, vibrant touch to your meals.
7. Basil, Mint, and Other Herbs: Propagating Cuttings in Jars
Herbs like basil and mint can be easily propagated from cuttings. Snip a healthy stem with several leaves, remove the bottom leaves, and place the stem in a jar with water. Change the water every few days and ensure it receives plenty of sunlight. Roots will begin to form within a week, and once they are a few inches long, the cutting can be planted in soil for continued growth.
This method allows you to expand your herb garden effortlessly and ensures you have fresh herbs on hand for cooking.
8. Regrowing Garlic, Onions, and Shallots for Flavorful Greens
Garlic, onions, and shallots can be regrown for their flavorful greens. Plant a garlic clove or the bottom of an onion or shallot in a jar with water just covering the base. Place the jar in a sunny spot. In about a week, green shoots will appear. These greens can be snipped and used as a substitute for chives or green onions in recipes.
This method not only enhances your dishes with fresh flavors but also maximizes the use of pantry staples.
9. Avocado Pits in Jars: Classic Toothpick Trick and New Shortcuts
The classic method for regrowing avocados involves suspending a cleaned pit over a jar of water using toothpicks inserted into the pit’s sides. Keep the bottom half submerged in water on a sunny windowsill. Within 2-8 weeks, roots and a stem will start to form. Alternatively, newer methods involve partially burying the pit in a pot of soil and keeping it moist, which can be less labor-intensive.
While growing a full avocado tree takes patience and time, the process is a rewarding experiment in plant propagation.
10. Pineapple Tops and Other Tropical Experiments on the Sill
To regrow a pineapple, twist off the top leaves and remove the lower few layers to expose the base. Allow it to dry for a few days, then place it in a shallow jar with water just touching the base. Place it in a sunny location, and over the weeks, roots will form. Once established, it can be planted in soil for further growth.
Regrowing tropical plants like pineapples indoors can be a fascinating project but requires patience, as it can take years to produce fruit.
11. Preventing Rot, Mold, and Pests in Your Water Jars
To prevent rot and mold, regularly change the water in your jars and rinse the plant bases to remove any decaying material. Ensure the jar is not overfilled, as excess water can lead to mold growth. To deter pests, such as fruit flies, keep the area clean and free of food debris, and consider using a few drops of natural insect repellents like neem oil in the water.
These maintenance steps are crucial for keeping your regrowing projects healthy and thriving.
12. Transitioning From Jar to Pot: When and How to Plant On
Once your plant has developed a robust root system, it’s time to transition it to soil. This usually occurs when roots are about 1-2 inches long. Choose a pot with drainage holes and fill it with a quality potting mix. Carefully transplant the plant, ensuring roots are covered and the base is above soil level. Water it thoroughly and place it in a location with appropriate sunlight.
This transition helps the plant access more nutrients and grow to its full potential.
13. Troubleshooting Common Regrowing Problems
Common issues in regrowing plants include slow growth, yellowing leaves, and root rot. Slow growth can often be remedied by ensuring the plant receives enough sunlight and fresh water. Yellowing leaves may indicate nutrient deficiency or overwatering. Adjust water levels and consider adding a diluted liquid fertilizer. Root rot, usually from excess water, requires trimming away affected roots and improving drainage.
By observing and adjusting care routines, most regrowing problems can be resolved, ensuring healthy plant development.
14. Making It Beautiful: Styling Your Windowsill Regrow Garden
To create an aesthetically pleasing regrow garden, use jars of varying shapes and sizes for visual interest. Position them at different heights with the help of risers or stands. Incorporate decorative labels and add natural elements like pebbles or shells at the bottom of the jars for a touch of elegance.
By combining functionality with style, your windowsill regrow garden can become a stunning focal point in your home, inspiring others to embrace sustainable practices.