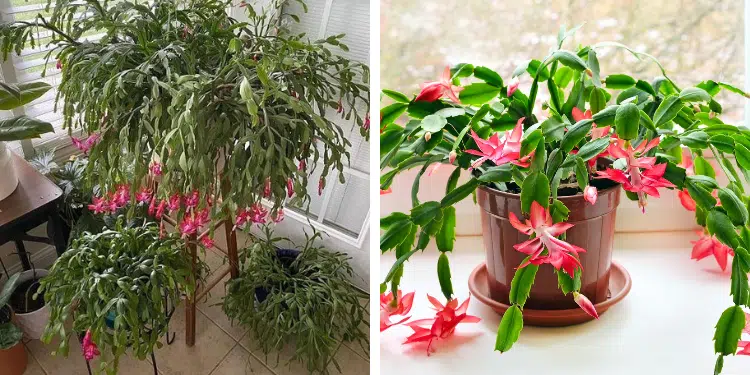
The Christmas cactus (Schlumbergera spp.) is one of the most beloved winter-blooming houseplants – treasured for its vibrant pink, red, or white blossoms that light up homes during the coldest months.
But did you know you can easily multiply your Christmas cactus before bloom season and enjoy even more plants, blooms, and beauty in time for the holidays?
Unlike many plants, this cactus thrives on propagation. With just a few healthy cuttings and some simple care, you can turn one plant into many – all ready to flower when December arrives.
Why Propagate Before Bloom Season?
Timing is everything with Christmas cactus. Propagating in late summer or early fall gives the new cuttings enough time to develop roots and settle in before the blooming period begins.
Here’s why this matters:
- Rooted cuttings bloom sooner than newly planted ones.
- The parent plant recovers faster before entering its flowering cycle.
- You can shape or rejuvenate older plants while creating new ones.
- Fresh growth helps trigger a healthier, more abundant bloom.
When done right, you’ll not only multiply your collection but also boost the flowering performance of your original cactus.
Step 1: Choose the Right Parent Plant
Select a mature, healthy Christmas cactus that has finished its last growth spurt and shows no signs of disease or rot. The best stems for propagation are:
- Firm and plump, not shriveled or soft
- At least 3–5 segments long
- Deep green with no signs of yellowing or scarring
Avoid taking cuttings from plants that are currently budding or flowering – the stress can weaken both the parent and the cutting.
Step 2: Take the Cuttings Correctly
The easiest way to propagate a Christmas cactus is through stem segment cuttings.
How to Take Cuttings:
- Gently twist (not cut) the stem where two segments meet.
- Each cutting should contain at least 3 segments for best rooting success.
- Let the cuttings dry for 24–48 hours in a shaded, well-ventilated area.
This drying process (called callusing) helps prevent rot when the cuttings are placed in soil.
Pro Tip: If you prefer precision, use sterilized scissors or pruning shears, but twisting by hand often produces cleaner breaks at natural joints.
Step 3: Rooting Methods – Soil or Water
Christmas cactus cuttings root easily in both water and soil. Choose whichever method suits you best.
Option 1: Rooting in Water
- Fill a glass or jar with about an inch of water.
- Place the cuttings so that only the bottom segment touches the water.
- Keep them in bright, indirect light – never direct sun.
- Change the water every few days to keep it fresh.
Within 2–3 weeks, you’ll notice tiny roots forming at the nodes. Once they’re an inch long, transplant the cuttings into a potting mix.
Option 2: Rooting in Soil
- Use a small pot with well-draining soil – ideally a cactus or succulent mix.
- Insert the base of each cutting about an inch deep.
- Lightly water the soil, keeping it slightly moist (not soggy).
- Cover the pot with a clear plastic bag to create a mini greenhouse effect.
Roots usually develop in 3–4 weeks. You can test by gently tugging – if there’s resistance, roots have formed.
Step 4: Potting and Placement
Once your cuttings have rooted, transplant them into small individual pots or group several together for a fuller look.
Best Soil Mix:
- 2 parts regular potting soil
- 1 part coarse sand or perlite for drainage
- Optional: 1 part orchid bark or coconut coir for aeration
Place your new plants in bright, indirect light, such as near an east- or north-facing window. Avoid harsh midday sun, which can scorch the leaves.
Step 5: Watering and Feeding for Fast Growth
To help your new Christmas cactus multiply successfully, proper watering and feeding are essential.
Watering:
- Keep the soil evenly moist but never soggy.
- Allow the top inch of soil to dry before watering again.
- Use room-temperature water to avoid shocking the roots.
Feeding:
- Start fertilizing lightly 4–6 weeks after rooting.
- Use a balanced 10-10-10 or 20-20-20 fertilizer, diluted to half strength.
- Feed once every 2–3 weeks until early fall, then stop to encourage bloom bud formation.
Step 6: Preparing for Bloom Season
Your goal is to have healthy, established cuttings by late fall – ready to set buds for Christmas.
To Trigger Blooming:
- Shorten daylight exposure: Give your cactus 12–14 hours of darkness each night for about 6 weeks.
- Cooler temperatures: Keep it around 60–65°F (15–18°C).
- Reduce watering: Slightly dry out the soil to mimic its natural dormancy.
Within a few weeks, you’ll notice tiny buds forming at the tips of the segments – a sign your propagation and pre-bloom care have worked.
Step 7: Multiply Smartly Every Year
One of the best things about Christmas cactus propagation is that it can be done annually.
Each year after blooming, prune lightly and save a few healthy segments for new cuttings. This keeps the mother plant compact and encourages branching – resulting in bushier growth and more blooms next season.
Over time, you’ll have multiple plants to decorate your home, gift to friends, or even start a small indoor collection of your own.
Common Mistakes to Avoid
- Overwatering: The #1 cause of cutting failure. Keep soil slightly damp, not soaked.
- Using heavy garden soil: Poor drainage leads to rot. Always use a loose, airy mix.
- Too much direct sunlight: Causes leaf burn and dehydration.
- Skipping the callusing step: Cuttings planted immediately after trimming often rot before rooting.
Multiplying your Christmas cactus before bloom season is an easy, rewarding process that ensures a house full of color and life come winter.
With just a few stem cuttings, proper timing, and patience, you can create an endless supply of these festive, low-maintenance plants.