The internet is filled with gardening hacks that promise incredible results with almost no effort, but few have become as popular as the tomato slice planting method.
You’ve probably seen the videos: someone cuts a ripe tomato into slices, places them in a pot, covers them with soil, and a few weeks later dozens of tomato seedlings appear.
While many people assume this is just another viral gardening myth, the truth is that the basic science behind the method is completely real.
Every tomato contains dozens of viable seeds, and when those seeds are placed into warm, moist soil, they can germinate surprisingly quickly. In fact, a single tomato can potentially produce enough seedlings to fill an entire garden bed.
However, what most viral videos fail to show is what happens after those seeds sprout. This is where many gardeners unknowingly make mistakes.
While burying tomato slices is an excellent way to start seedlings for free, leaving all those seedlings crowded together will almost certainly result in weak plants and poor harvests.
If you understand how to manage the seedlings properly, this simple kitchen-scrap method can become one of the easiest and cheapest ways to grow a huge supply of tomatoes for your garden.
Why Tomato Slices Actually Work
Inside every ripe tomato are dozens of seeds surrounded by a gel-like coating. Under natural conditions, a tomato eventually falls to the ground, decomposes, and releases its seeds into the soil.
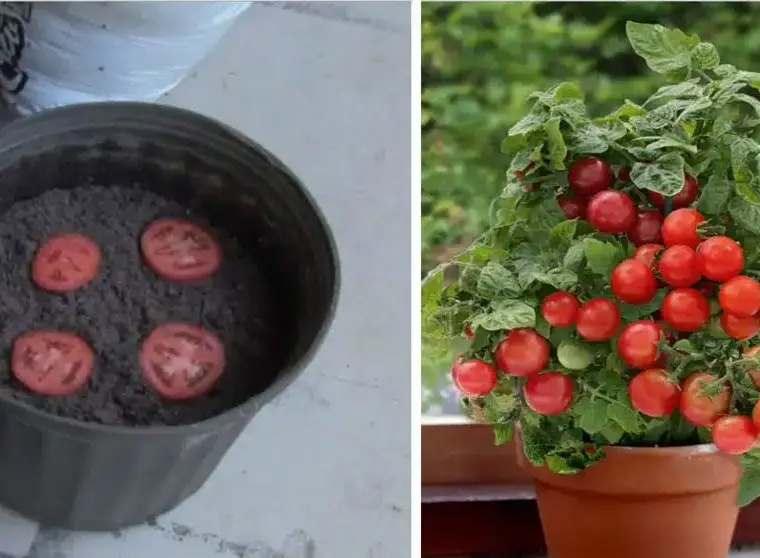
The tomato slice method simply speeds up this natural process. When a slice is buried beneath a thin layer of soil, several things happen:
The tomato flesh begins to decompose and provide moisture around the seeds. Soil microbes start breaking down the fruit, while warmth and moisture trigger germination. Within a week or two, dozens of seedlings may emerge from a single slice.
This is why the method works so reliably. The challenge is not getting seeds to sprout.
The challenge is managing the overwhelming number of seedlings that appear afterward.
What Happens When You Leave the Seedlings Crowded Together
Many gardeners become excited when they see a thick carpet of green sprouts emerge from the soil.
Unfortunately, this is exactly where problems begin.
A single tomato slice may contain twenty, thirty, or even fifty seeds. When all of these germinate in the same small area, the seedlings immediately begin competing against one another.
Above the soil, they compete for sunlight.
Below the soil, they compete for water, oxygen, nutrients, and root space.
Because tomatoes are aggressive growers, their roots quickly become tangled into a dense underground mat. As the plants continue growing, each seedling receives fewer resources.
Instead of producing strong healthy plants, the result is usually:
- Thin stems
- Weak root systems
- Slow growth
- Yellowing leaves
- Poor fruit production
Eventually many seedlings simply stop growing altogether.
This is why successful gardeners never leave the seedlings crowded together for long.
Step 1: Choosing the Right Tomato
Not all tomatoes produce identical results.
The best tomatoes for this method are open-pollinated or heirloom varieties because the seeds grow true to the parent plant.
Popular choices include:
- Cherokee Purple
- San Marzano
- Brandywine
- Roma
- Amish Paste
- Sweet Cherry Tomatoes
- Black Krim
Many grocery-store tomatoes are hybrids. Their seeds may still germinate, but the resulting plants may not produce fruit that looks or tastes like the original tomato.
For predictable results, heirloom varieties are usually the best choice.
Step 2: Planting the Tomato Slices
- Choose a small container, seed tray, or starter pot filled with high-quality seed-starting mix.
- Cut a ripe tomato into slices about one-quarter inch thick.
- Lay two to four slices flat on top of the soil.
- Cover them with about half an inch of loose potting mix.
- Water thoroughly until the soil is evenly moist but not soaked.
- Place the container somewhere warm and bright.
- Tomato seeds germinate best when temperatures stay between 70°F and 85°F (21°C to 29°C).
- Under ideal conditions, seedlings often appear within 7 to 10 days.
Step 3: The Most Important Stage – Separating the Seedlings
This is the step that determines whether the method succeeds or fails.
Once the seedlings reach approximately 2 to 3 inches tall and develop their first true leaves, they must be thinned or separated.
At this stage, the roots are still small enough to handle without significant damage.
Carefully remove the entire root ball from the container.
Gently loosen the soil using your fingers and separate the seedlings one at a time.
Work slowly and patiently.
Many gardeners are surprised by how resilient tomato seedlings actually are.
As long as you preserve most of the roots, they usually recover quickly.
Why Tomatoes Are Unique
Tomatoes possess an amazing characteristic that many vegetables do not.
They can develop roots all along their stems.
This means that when transplanting seedlings, you can bury much of the stem underground.
Every buried section of stem eventually develops new roots.
As a result, transplanted tomato seedlings often become stronger after being moved.
This unique ability is one reason tomatoes are among the easiest vegetables to transplant successfully.
Step 4: Pot Each Seedling Individually
After separating the seedlings, place each one into its own small container filled with nutrient-rich potting soil.
Bury the seedling deeply.
Leave only the top leaves exposed above the soil surface.
The buried stem will soon develop an extensive root system.
This deeper planting creates:
- Stronger root development
- Better drought resistance
- Faster growth
- Increased nutrient uptake
- Stronger stems
Many experienced gardeners intentionally plant tomatoes deeper than almost any other vegetable.
Step 5: Harden Off Before Moving Outdoors
Before placing tomato plants outdoors permanently, they must adjust gradually to outdoor conditions.
This process is called hardening off.
Indoor-grown seedlings are not accustomed to:
- Direct sunlight
- Wind
- Temperature fluctuations
Suddenly placing them outside can shock or damage them.
Start by placing the plants outdoors for a few hours each day in a protected location.
Gradually increase exposure over seven to ten days.
By the end of the process, the plants should tolerate full outdoor conditions without difficulty.
Step 6: Transplant Into the Garden
Once frost danger has passed and seedlings reach 6 to 8 inches tall, they are ready for their permanent location.
Space plants at least:
- 24 inches apart for most varieties
- 36 inches apart for larger indeterminate varieties
Proper spacing improves:
- Airflow
- Disease prevention
- Sunlight exposure
- Fruit production
Crowded tomato plants are much more susceptible to fungal diseases and pest infestations.
Supporting Tomato Plants Early
One of the most common beginner mistakes is waiting too long to add support.
Tomatoes become surprisingly heavy once fruit begins developing.
Install cages, stakes, or trellises immediately after planting.
Doing so prevents root damage later and helps keep fruit off the ground.
Supported plants generally produce:
- Healthier fruit
- Better airflow
- Easier harvesting
- Reduced disease pressure
Watering for Maximum Production
Tomatoes need consistent moisture to produce high-quality fruit.
Inconsistent watering often leads to:
- Cracked tomatoes
- Blossom-end rot
- Poor fruit development
- Stress
Water deeply rather than frequently.
The goal is to encourage roots to grow downward into the soil.
Mulching around the plants helps maintain moisture and keeps root temperatures stable throughout summer.
Feeding Tomato Plants for Bigger Harvests
Tomatoes are heavy feeders.
After transplanting, they benefit from rich soil containing:
- Compost
- Aged manure
- Organic fertilizer
Once flowering begins, focus on fertilizers that support fruit production rather than excessive leaf growth.
Too much nitrogen often creates giant green plants with surprisingly few tomatoes.
Balanced feeding encourages continuous flowering and larger harvests.
Why This Method Can Produce So Many Tomatoes
One tomato slice may contain dozens of viable seeds.
If properly separated and transplanted, a single tomato can potentially produce twenty or more healthy plants.
Each mature tomato plant may yield dozens of pounds of fruit over the growing season.
This means that a few tomato slices that would normally end up in the compost pile can eventually become hundreds of tomatoes.
That is why this simple method remains one of the most effective kitchen-scrap gardening techniques available.
Growing tomatoes from slices is not just a viral internet trend – it is a legitimate gardening technique based on natural seed germination. The secret is understanding that the seedlings cannot remain crowded together.