The Christmas cactus is one of the easiest and most rewarding houseplants to propagate. With just a few healthy segments, you can grow entirely new plants that will eventually bloom with beautiful flowers year after year.
The plant known as Schlumbergera truncata is not a desert cactus, but a tropical epiphyte that naturally grows on trees in humid forests. This unique nature makes it especially easy to propagate from cuttings.
Why Propagating Christmas Cactus Is So Easy
Christmas cactus propagates easily because of its segmented stems.
Each segment (called a cladode) has the ability to develop roots and grow into a new plant.
Unlike many houseplants, it does not require complicated techniques or special tools.
With the right steps, you can achieve a very high success rate.
When Is the Best Time to Propagate?
Timing plays an important role in successful propagation.
The best time to propagate a Christmas cactus is:
- after it finishes blooming
- in early spring or early summer
During this time, the plant is entering its active growth phase, which helps cuttings root faster.
Avoid propagating during flowering, as this can stress the plant.
Step 1: Choose a Healthy Parent Plant
Successful propagation starts with selecting the right plant.
Look for a Christmas cactus that is:
- healthy and disease-free
- vibrant green in color
- actively growing
Avoid plants with soft, shriveled, or damaged segments.
A strong parent plant produces stronger cuttings.
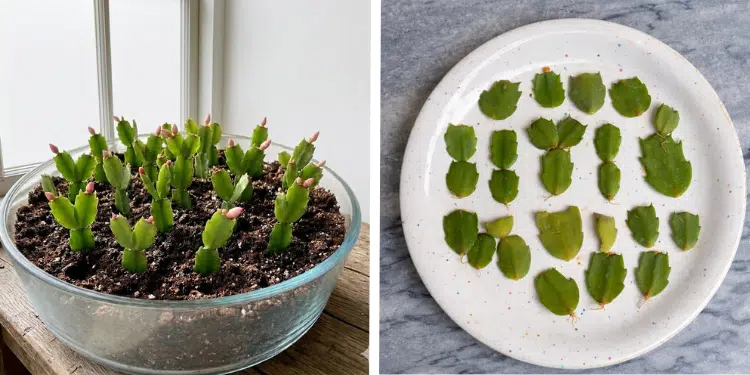
Step 2: Select the Right Cuttings
Choosing the right cutting is one of the most important steps.
A good cutting should include 2 to 4 connected segments.
Avoid taking only one segment, as longer cuttings root more easily.
How to remove the cutting
Gently twist the segment where it connects to the main plant.
Do not cut with scissors if possible—twisting creates a clean break and reduces damage.
Step 3: Let the Cuttings Callus
This step is often overlooked but extremely important.
After removing the cutting, let it sit in a dry place for 24 to 48 hours.
This allows the cut end to form a callus (a dry protective layer).
Why this matters
If you plant the cutting immediately, it may rot due to excess moisture.
Allowing it to dry reduces the risk of fungal infection.
Step 4: Prepare the Right Soil Mix
Christmas cactus does not grow well in heavy soil.
It needs a light, well-draining mix.
Ideal soil mix
- cactus or succulent soil
- mixed with perlite or sand
This type of soil allows excess water to drain quickly while still holding enough moisture for roots to develop.
Step 5: Plant the Cutting Properly
Once the cutting has callused, it’s ready to plant.
How to plant
- Insert the bottom segment about 1–2 cm into the soil
- Keep the cutting upright
- Do not bury too deeply
Planting too deep can cause rot, while shallow planting encourages healthy root formation.
Step 6: Water Carefully
Watering is critical during propagation.
First watering
Lightly moisten the soil after planting.
Do not soak it.
Ongoing care
- Keep the soil slightly moist, not wet
- Allow the top layer to dry slightly between watering
Overwatering is the most common reason cuttings fail.
Step 7: Provide the Right Light
Light plays a key role in root development.
Place your cuttings in:
- bright, indirect light
Avoid direct sunlight, which can dry out or damage the cuttings.
A windowsill with filtered light is ideal.
Step 8: Maintain Proper Temperature and Humidity
Christmas cactus prefers warm, stable conditions.
Ideal conditions
- temperature: 18–24°C (65–75°F)
- moderate humidity
Avoid cold drafts or sudden temperature changes.
Stable conditions help roots develop faster.
Step 9: Be Patient – Rooting Takes Time
Rooting does not happen instantly.
Typically, cuttings begin to root within:
- 2 to 4 weeks
During this time, avoid disturbing the cutting.
You may notice:
- new growth forming
- the cutting becoming more stable in the soil
These are signs that roots are developing successfully.
Step 10: Transplant When Ready
Once roots are established, you can move the plant to a larger pot if needed.
Signs it’s ready
- visible new growth
- stronger, upright structure
- resistance when gently tugged
Transplant into a slightly larger pot with the same well-draining soil mix.
Alternative Method: Rooting in Water
Although soil propagation is most common, Christmas cactus can also root in water.
How to do it
- Place the cutting in a small container of water
- Submerge only the bottom segment
- Keep in bright, indirect light
Important tips
- change water every few days
- avoid submerging too much of the cutting
Roots typically appear within 2–3 weeks.
Once roots are about 2–3 cm long, transfer to soil.
Common Mistakes to Avoid
Even though propagation is simple, a few mistakes can reduce success.
Overwatering
Too much water causes rot before roots form.
No callusing
Skipping the drying step increases risk of infection.
Poor lighting
Too little light slows root development.
Planting too deep
Buried cuttings are more likely to rot.
Avoiding these mistakes greatly improves success rates.
How to Encourage Faster Growth
Once your cutting has rooted, you can help it grow faster.
Provide consistent light
Bright indirect light encourages steady growth.
Feed lightly
Use diluted fertilizer once growth begins.
Pinch tips
Pinching new growth encourages bushier plants.
These steps help create a fuller, healthier plant.
When Will Your New Plant Bloom?
Newly propagated Christmas cactus plants usually take time to mature.
Most will bloom within:
- 1 to 2 years
Blooming depends on proper care, including light cycles and cooler temperatures in autumn.
Patience is key—but the reward is worth it.
Why Propagation Is Worth It
Propagating Christmas cactus offers many benefits.
You can:
- multiply your plants for free
- rejuvenate older plants
- share cuttings with friends and family
- create fuller, bushier pots
Because the process is so easy, even beginners can succeed.
Propagating a Christmas cactus is one of the simplest and most satisfying gardening techniques.
By selecting healthy cuttings, allowing them to callus, planting them in well-draining soil, and providing proper light and care, you can grow new plants with minimal effort.