Orchids are often considered mysterious plants – breathtaking when in bloom, frustrating when they stop.
For many people, receiving an orchid as a gift or buying one in full flower is the beginning of a short relationship. When the last petal falls, most orchids are sadly thrown away, thought to be “finished.”
But here’s the truth: your orchid is not dead when it stops blooming – it’s only resting. With the right care, that same orchid can bloom again and again for many years, sometimes even decades.
Understanding Orchid Bloom Cycles
To unlock reblooming, you first need to understand the natural rhythm of orchids.
Unlike many houseplants, orchids follow a distinct cycle:
1. Bloom Phase
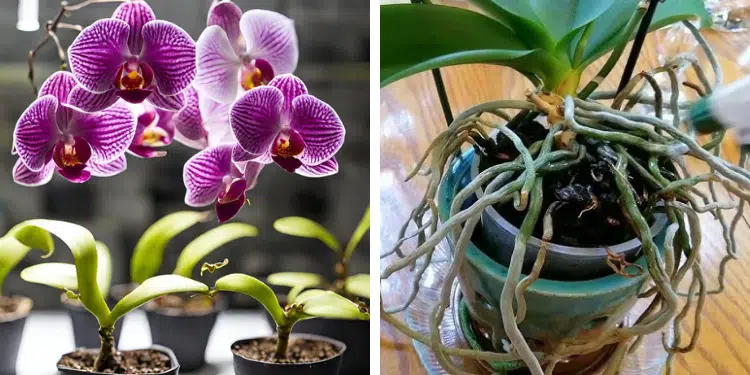
- Orchids (especially Phalaenopsis, the most common type) typically bloom once or twice a year.
- Blooms last from 6 weeks up to 3 months, depending on the species and care.
- During this stage, orchids focus energy on flowers rather than new leaves or roots.
2. Resting (Dormant) Phase
- After the blooms drop, orchids enter a recovery phase.
- This is when they store energy, rebuild root systems, and prepare internally for the next bloom.
- To the untrained eye, the plant looks plain, but it’s recharging.
3. Spike Initiation Phase
- When conditions are right (light, temperature, and nutrients), orchids push out new flower spikes.
- This is the signal that reblooming is on the way.
Key takeaway: If you treat your orchid correctly after it blooms, it will reward you with a new cycle of flowers.
Why Orchids Stop Blooming
When orchids refuse to rebloom, the problem usually lies in one of these factors:
- Light deficiency: Orchids need bright, indirect light. A north-facing windowsill rarely provides enough.
- No temperature variation: Without a slight difference between day and night, orchids don’t receive the signal to bloom.
- Improper watering: Too much water suffocates roots; too little dries them out.
- Nutrient imbalance: Orchids require specific nutrients for flower production.
- Neglected rest period: Orchids need time to recover before producing flowers again.
If you’ve been caring for an orchid and it hasn’t bloomed for over a year, it’s not hopeless – it simply hasn’t received the right signals.
The Secret Trick: Nighttime Temperature Drop
Here’s the #1 proven secret to trigger orchid reblooming: Expose your orchid to a nighttime temperature drop of 10°F (5°C) for 2–4 weeks.
Why This Works
In their natural habitats (tropical and subtropical regions), orchids experience warm days and cooler nights.
That change signals to the plant: It’s time to reproduce. Indoors, where we keep steady temperatures, orchids miss this cue.
By introducing a nighttime drop, you replicate nature’s signal – and the orchid responds by sending up a new flower spike.
How to Do It
- In fall (September–November): Place orchids near a window where nighttime temps are naturally cooler.
- Outdoor method: In mild climates, set orchids outside for a few weeks when nights dip to 55–65°F (13–18°C).
- Indoor method: Move the plant to a cooler room at night, then return it to warmer light during the day.
Within 2–4 weeks, you should see a new flower spike emerging near the base of the leaves.
Step-by-Step Guide: Caring for Orchids After Blooming
When the final petals of your orchid fall, it can feel like the show is over. Many people assume the plant has reached the end of its life cycle, but in reality, it has just shifted gears into its resting phase.
This is the moment when the orchid begins recharging its energy, rebuilding roots and leaves, and preparing for its next bloom.
What you do during this period will determine whether you enjoy another round of flowers or end up with a plant that stays green but flowerless.
Here’s a complete guide to caring for orchids after they bloom, with everything explained in detail.
Step 1: Assess the Flower Spike
The flower spike, or stem, is the first part of the plant you need to evaluate once the flowers fade. If the spike is still green and firm, it still contains life.
In many cases, a green spike can produce side branches or even a second flush of blooms from dormant buds.
Leaving it in place gives your orchid the chance to surprise you with bonus flowers.
If the spike has turned brown, shriveled, or dried out, it’s no longer useful to the plant. At this point, the best thing you can do is cut it back all the way down to the base.
Always use sterilized scissors or pruning shears to avoid introducing bacteria or fungi into the wound.
This simple step helps the orchid redirect its energy away from the spent stem and back into roots and leaves, where it’s needed most.
Step 2: Reduce Watering
Orchids in bloom require more frequent watering to support the flowers. But once the blooms are gone, the plant enters a rest phase, and its water needs decrease.
Overwatering at this stage is one of the most common mistakes people make.
The key is to watch the roots. Healthy orchid roots turn green after watering, then slowly shift to a silvery-gray as they dry.
This silvery color is your signal to water again. Depending on your climate and indoor conditions, this may mean watering every 7–10 days in cooler months rather than every 3–5 days.
Always allow excess water to drain completely from the pot. Never let the orchid sit in standing water, as this suffocates the roots and quickly leads to rot.
Step 3: Adjust Fertilizer
Once the flowers have dropped, your orchid no longer needs high levels of phosphorus, the nutrient that fuels blooming.
Instead, it benefits most from a balanced fertilizer that supports leaf and root growth. A formula such as 20-20-20, diluted to half or even quarter strength, is ideal during the resting stage.
Apply this every two weeks while the plant is regaining its strength.
When you notice a new flower spike beginning to form, you can switch to a bloom booster fertilizer with a higher phosphorus ratio to encourage strong buds and lasting flowers.
Think of fertilization as giving your orchid a gentle nudge in the right direction depending on what stage it’s in.
Step 4: Provide Proper Light
Light is what fuels everything in an orchid’s cycle, from root growth to flower production. After blooming, orchids need a steady supply of bright, indirect light to recharge.
Place your plant in an east-facing window where it can soak up morning sun without being scorched. A south-facing window also works if you use a sheer curtain to soften the intensity of the midday rays.
If your home doesn’t provide enough natural light, especially in winter, a small LED grow light can make all the difference.
Position it about 10–12 inches above the plant and run it for 12–14 hours a day to mimic tropical daylight conditions.
Without enough light, an orchid may grow leaves but won’t have the energy to rebloom.
Step 5: Encourage a Temperature Drop
One of the most overlooked secrets to reblooming orchids is temperature. In the wild, orchids experience warmer days and cooler nights, and this fluctuation tells them it’s time to produce a new flower spike.
Indoors, where temperatures often remain stable, orchids miss this natural cue.
You can recreate it by exposing your orchid to a drop of about 10°F (5°C) at night. If your days are 70–75°F (21–24°C), aim for 60–65°F (15–18°C) at night.
This can be as simple as moving your orchid near a slightly draftier window in autumn or placing it in a cooler room for a few weeks. With this gentle push, the orchid often responds by initiating a new spike.
Step 6: Support the New Spike
When a new spike emerges, usually from the base of the plant between the leaves, it begins as a small nub that gradually elongates.
This is a crucial stage, and the plant needs steady conditions. Provide consistent water, regular fertilization, and strong but indirect light.
As the spike grows taller, it will eventually need support to prevent bending or snapping. Insert a slender stake into the potting medium and loosely tie the spike with soft clips or plant ties.
Avoid anything too tight, as you don’t want to damage the stem. Supporting the spike ensures the developing flowers will be held upright and displayed beautifully once they open.
Step 7: Return to Blooming Care
Once buds begin to form along the spike, your orchid has successfully transitioned back into the blooming phase.
This is the time to maintain even moisture – don’t let the roots dry out completely, but also don’t water so much that the potting medium stays soggy. Fertilize lightly every two weeks with a bloom-focused formula.
It’s also important to avoid moving the plant around during this time. Sudden changes in light, drafts, or humidity can cause bud blast, where developing buds shrivel and drop before they open.
Choose a stable spot with steady conditions and let the orchid do the rest.
Advanced Orchid Care After Blooming
Once you’ve mastered the basics, there are several advanced techniques that can improve your orchid’s long-term health and increase the likelihood of repeat blooms.
Repotting
Every year or two, orchids need to be repotted into fresh medium. Bark and moss eventually decompose, holding too much water and suffocating the roots.
Repotting gives the roots space to grow and restores proper airflow.
Root Care
Each time you repot, inspect the roots. Healthy orchid roots are plump and firm, usually green when wet and silvery when dry.
Trim away any mushy or hollow roots with sterilized scissors. This prevents rot and encourages new healthy growth.
Humidity Management
Orchids thrive in environments with 40–60 percent humidity. If your air is too dry, use a humidity tray filled with pebbles and water, mist lightly in the mornings, or place a humidifier nearby.
Proper humidity prevents buds from drying out and helps flowers last longer once they bloom.
Water Quality
Tap water often contains salts, chlorine, or fluoride that can build up and damage orchids over time.
Using rainwater, distilled water, or filtered water ensures the roots absorb only what they need without harmful residues.
Balanced Growth
Rotate your orchid every week or two so that each side gets equal light exposure. This prevents lopsided growth and encourages stronger, more balanced spikes.
FAQs About Reblooming Orchids
Q: How long before an orchid blooms again?
Usually 6–12 months, depending on care.
Q: Should I cut back green spikes?
No – leave them for potential side blooms.
Q: Do orchids bloom more than once a year?
Yes. With proper care, some bloom twice yearly.
Q: How long do orchids live?
Many orchids can live 10–20 years or more.
If your orchid has stopped blooming, don’t give up on it. With the right care – especially the nighttime temperature drop trick – your plant can bloom again and again for many years.
Orchids are not disposable; they’re living treasures. With patience, you’ll discover the joy of coaxing new spikes, watching buds form, and enjoying wave after wave of exotic flowers in your home.