Plastic cups might seem like simple disposable items, but in the garden they can become surprisingly powerful tools.
Whether you’re starting seeds, protecting seedlings, organizing your workspace, or managing watering more precisely, plastic cups can be reused in dozens of smart ways.
For beginner gardeners and experienced growers alike, these low-cost items can solve common problems quickly and effectively.
Reusing plastic cups in the garden also supports waste reduction. Instead of throwing them away, you can turn them into mini planters, irrigation aids, pest guards, and measuring tools. With a few small modifications, a basic cup becomes part of a practical gardening system.
Why Plastic Cups Work So Well in Gardening
Plastic cups are useful because they are:
- Lightweight
- Easy to cut or punch
- Water-resistant
- Cheap or free
- Uniform in size
- Transparent or semi-transparent (useful for observation)
They are especially valuable in seed starting and early plant care, where small containers and micro-environments matter.
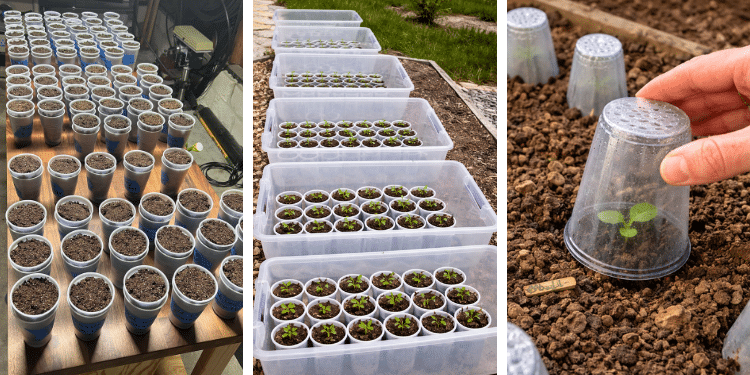
1. Seed Starting Containers – Why Cups Work Better Than Many Trays
Plastic cups are excellent for starting seeds because they give each plant its own root space.
Unlike crowded seed trays where roots quickly tangle, a single cup allows stronger early root structure and reduces transplant shock later.
Start by punching several drainage holes in the bottom – this step is critical. Without drainage, seedlings fail from root rot. Use a heated nail or drill bit for clean holes.
Fill the cup with a light seed-starting mix, not heavy garden soil, which compacts too much for young roots. Plant seeds at proper depth, water gently, and place cups on a tray to catch runoff.
Clear cups add an extra advantage: you can see moisture levels and root growth. When roots circle the sides, it’s the perfect transplant moment.
This method works especially well for tomatoes, peppers, cucumbers, squash, herbs, and flowers that outgrow cell trays quickly.
2. Mini Greenhouse Domes – Creating a Germination Microclimate
Seeds germinate faster when humidity stays stable. Clear plastic cups placed upside down over soil act like mini humidity domes, trapping warmth and moisture close to the seed surface.
This is especially useful for slow or sensitive germinators and for plant cuttings that need high humidity to root.
The dome prevents the top layer of soil from drying too quickly – a common cause of failed germination.
However, airflow matters. Lift the cup daily for a minute or two to prevent fungal growth and damping-off disease. Once sprouts appear, remove the dome gradually rather than all at once to avoid shock.
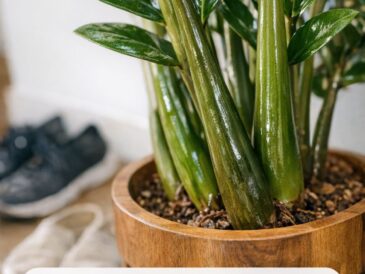
3. Transplant Transition Pots – Reducing Seedling Shock
Many seedlings struggle when moved directly from small starter cells to the outdoor garden. Plastic cups serve as an intermediate “step-up pot,” allowing plants to size up gradually.
Start seeds in trays, then move the strongest seedlings into cups once they develop true leaves. This gives roots more space and lets stems strengthen before facing outdoor stress.
By the time you transplant into the garden, the plant has a dense, stable root ball that holds soil together and resists transplant shock.
This staged method noticeably improves survival rates for warm-season crops.
4. Root Observation Cups – The Double-Cup Method Professionals Use
Using a clear cup inside a solid outer cup lets you monitor roots without disturbing the plant. Punch drainage holes in the inner clear cup only. Plant normally, then place it inside a second cup with no holes.
When you want to check root progress, slide the inner cup out briefly. You can see whether roots are circling, how dense they are, and whether moisture is balanced. Then slide it back in.
This method dramatically reduces overwatering and helps you transplant at the ideal moment – not too early and not too late.
5. Measuring Water for Seedlings – Precision Prevents Problems
Overwatering kills more seedlings than underwatering. Plastic cups give you a simple way to standardize watering amounts.
Instead of guessing, fill a cup with a measured volume and apply slowly at the soil surface. You can draw fill lines on the side – for example 50 ml, 100 ml – and repeat the same amount each time. This builds consistency and prevents waterlogging.
This method is especially useful for indoor seedlings and microgreens.
6. Slow Drip Watering Cup – Emergency Micro-Irrigation
A plastic cup with tiny holes in the bottom becomes a slow-release irrigator. Fill it with water and place it near plant roots. Water seeps gradually into the soil rather than flooding it.
This is useful for new transplants, balcony containers, and hot-weather support. It reduces runoff and improves deep moisture penetration.
Make the holes very small – large holes empty too fast.
7. Seed Sorting and Storage Cups – Clean Planting Workflow
During planting sessions, seeds easily get mixed or spilled. Cups keep varieties separated and organized. You can pre-count seed batches, soak seeds, or separate stratification groups.
Label the outside clearly. This speeds planting and prevents costly variety mix-ups – especially when sowing multiple tomato or pepper cultivars.
8. Soil Scoop and Mixing Tool – Small Batch Efficiency
Plastic cups make perfect mini scoops for potting mix, compost, and amendments. Their size gives good control when filling small containers without spilling.
Cutting a V-shaped notch in the rim turns the cup into a precision pour scoop for narrow pots or cell trays. Keep one dedicated scoop near your potting station – it saves time and mess.
9. Fertilizer Measuring Cup – Preventing Overfeeding
Liquid fertilizers are often overapplied. A dedicated plastic cup marked with dilution lines prevents mistakes. Mark ratios directly on the cup – for example 1:10 or 1:20 – and reuse it only for fertilizer.
Consistent dosing improves plant health and prevents fertilizer burn.
10. Pest Protection Collars – Physical Barriers That Work
Cutworms and slugs attack seedlings at soil level. A bottomless plastic cup placed around the stem forms a protective barrier.
Cut off the base, slide the cup over the seedling, and push it slightly into the soil. This blocks crawling pests and reduces wind stress. It also prevents soil splash that spreads disease onto leaves.
Very effective for tomatoes, cabbage, peppers, and squash.
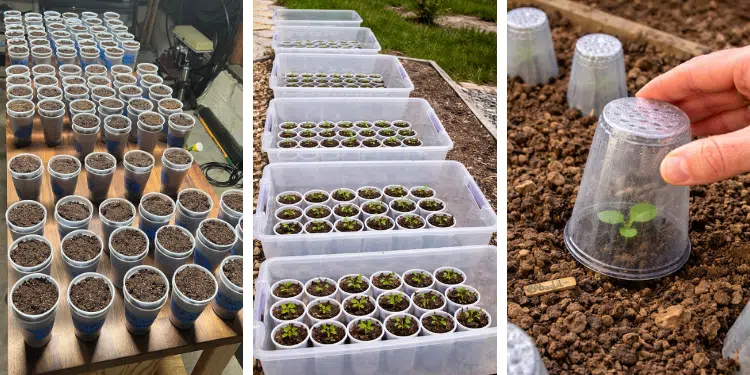
11. Mini Cloche for Frost Protection – Quick Cold Shield
When unexpected cold nights arrive, plastic cups act as emergency frost covers. Place them upside down over seedlings in the evening and remove them in the morning.
They trap ground heat and reduce frost exposure just enough to prevent damage. Add a tiny vent hole if daytime sun is strong to prevent overheating.
12. Plant Label Holders – Visible, Durable Markers
Plastic cups can serve as large, visible plant markers. Write the crop name on the side and place near rows or trays. Bright colors are easy to spot from a distance.
You can also cut cups into strips for long-lasting plastic labels that resist rain better than wooden sticks.
13. Bottom Watering Reservoirs – Healthier Seedlings
Bottom watering prevents stem rot and fungus problems. Place seedling pots inside a larger cup partially filled with water. Let soil absorb moisture upward for 10–20 minutes, then remove.
This encourages deeper root growth and keeps foliage dry – reducing disease risk.
14. Compost Tea Brewing Cups – Small Garden Scale
For balcony or container gardens, large compost tea buckets are unnecessary. A plastic cup works for micro-batches. Steep worm castings or compost in water, stir occasionally, dilute, and apply.
This gives small growers access to fresh nutrient tea without waste.
15. Tool Organizer – Small Item Control
Garden sheds accumulate tiny parts – clips, labels, hooks, screws, emitters. Plastic cups keep them separated and visible. Mount them inside drawers or trays to create instant compartment systems.
Organization saves time during busy planting season.
How to Make Plastic Cups More Garden-Friendly
To improve durability and reuse:
- Wash after each season
- Drill holes instead of poking when possible
- Avoid brittle sun-damaged cups
- Store out of UV light
- Reuse multiple seasons
Thicker party cups last longer than thin drink cups.
Safety and Sustainability Tips
While reusing plastic cups is practical, avoid using degraded or cracking plastic in food-growing soil long term. Replace when brittle. Whenever possible:
- Reuse instead of buying new
- Use food-grade plastics
- Avoid burning or overheating
- Transition to longer-life containers over time
Reuse is better than discard – but durability matters.
Plastic cups may be simple, but in the garden they become versatile problem-solvers.
From seed starting and watering control to pest protection and plant labeling, these everyday items can replace specialty tools and save money.