As the chill of winter fades and the promise of spring blooms on the horizon, garden enthusiasts turn their attention to revitalizing their beloved roses. These iconic flowers, renowned for their beauty and fragrance, require thoughtful care to awaken from their winter slumber. Early spring is the perfect time to engage in a series of steps that will set the stage for a season of robust growth and vibrant blossoms.
Reviving dormant roses involves more than just waiting for warmer weather. A strategic approach that includes assessing winter damage, cleaning up garden beds, and providing the right nutrients can make a significant difference. By understanding the specific needs of rose plants and tailoring your spring routine, you can ensure a thriving garden that brings joy throughout the growing season.
1. Assess Winter Damage and Identify Dormant vs. Dead Wood
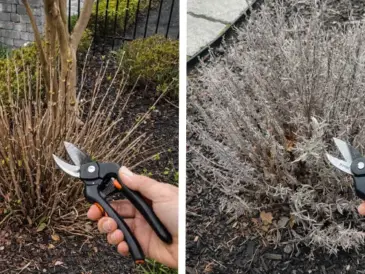
The first step in reviving your roses is to assess any winter damage. This process involves examining the canes and stems for signs of life. Dormant wood will feel firm, green, and pliable, while dead wood will be brittle, brown, and dry. Use a sharp pair of pruning shears to make a small cut on a stem. If the inside is green and moist, the wood is alive; if it’s brown and dry, it’s dead.
Once you’ve identified dead wood, remove it to prevent disease and pests. Cut back to healthy wood, making cuts about 1/4 inch above an outward-facing bud. This not only encourages new growth but also helps shape the plant for better air circulation and sunlight exposure, reducing the risk of fungal diseases.
2. Clean Up Beds and Remove Overwintered Debris
Clearing away debris from around your rose bushes is crucial in early spring. Dead leaves, fallen petals, and other organic matter can harbor pests and diseases that may have overwintered. Use a rake or your hands (wearing gloves) to gently remove this debris, being careful not to damage any new shoots that may be emerging.
Consider removing mulch that has broken down over the winter, as it may no longer provide effective insulation or weed suppression. By cleaning up the beds, you create a healthier environment for your roses to thrive and prepare the ground for new mulch application.
3. Prune Smartly to Shape Bushes and Stimulate New Growth
Pruning is a vital task in rose care, and early spring is the best time to tackle it. Pruning promotes healthy growth, removes damaged or diseased wood, and shapes the plant. Start by removing any dead, crossing, or weak stems. Aim to create an open center to improve air circulation.
For hybrid teas, floribundas, and grandifloras, cut back to about 18 to 24 inches from the ground. Shrub roses may only require light shaping. Always use clean, sharp tools to make clean cuts, which helps the plant heal faster and reduces the risk of infections.
4. Refresh the Soil With Compost and Organic Matter
Healthy soil is the foundation of a thriving rose garden. Begin by gently loosening the top layer of soil around your rose bushes with a hand fork or cultivator. This improves aeration and helps incorporate organic matter.
Add a layer of compost around the base of each plant, working it into the soil to a depth of about two inches. Compost improves soil structure, adds essential nutrients, and encourages beneficial microbial activity. Consider adding well-rotted manure or a balanced organic fertilizer to further enrich the soil.
5. Feed Roses Early With the Right Fertilizer Mix
Feeding your roses early in the season gives them the nutrients they need to support vigorous growth and abundant blooms. Choose a balanced rose fertilizer with an N-P-K ratio of about 5-10-5 or similar.
Apply the fertilizer around the base of each plant, following package instructions for the correct amount based on the size of your rose bushes. Be careful to avoid direct contact with the stems, as this can cause burning. Water the fertilizer in thoroughly to help it reach the root zone.
6. Water Deeply to Rehydrate Roots After Winter
After a long winter, your roses will need a good drink to rehydrate their roots. Water deeply, providing about one inch of water per week, depending on rainfall. Deep watering encourages roots to grow downwards, supporting healthier plants.
Avoid watering from overhead, as wet foliage can promote fungal diseases. Instead, use a soaker hose or drip irrigation to deliver water directly to the soil. Monitor soil moisture levels and adjust watering as necessary, especially in dry or windy conditions.
7. Apply Mulch Strategically to Warm Soil and Conserve Moisture
Applying mulch around your roses offers multiple benefits: it helps retain soil moisture, suppresses weeds, and gradually improves soil as it breaks down. In early spring, mulch also helps warm the soil, encouraging faster growth.
Use an organic mulch, such as shredded bark, wood chips, or straw, and apply it to a depth of about 2 to 3 inches. Be sure to leave a gap around the base of each rose to prevent moisture buildup against the stems, which can lead to rot.
8. Use Dormant Oils and Preventive Sprays Against Pests and Disease
Early spring is an ideal time to apply dormant oils and preventive sprays to protect your roses from pests and diseases. Dormant oil smothers overwintering insect eggs and larvae, while fungicidal sprays can prevent common diseases like black spot and powdery mildew.
Apply these treatments before new growth emerges, following product instructions carefully. Ensure thorough coverage of all stems and branches. Such preventive measures can significantly reduce pest and disease issues later in the season, leading to healthier plants and more beautiful blooms.
9. Check and Adjust Support Structures for Canes and Climbers
For climbing roses and those with long canes, providing adequate support is crucial. Inspect trellises, arbors, and stakes for any signs of damage or instability. Repair or replace structures as needed to ensure they can support the weight of the growing plant.
Gently tie new growth to supports using plant ties or soft twine. Avoid tying too tightly, as this can damage the plant. By guiding growth early in the season, you can create a more attractive display and prevent damage from wind or heavy blooms.
10. Time Your Steps to Local Climate and Rose Type for Best Results
Timing is everything when it comes to rose care. The exact timing for each step will depend on your local climate and the specific types of roses you grow. In general, begin your spring routine when the risk of hard frost has passed, and you see signs of new growth.
For areas with mild winters, this may be as early as late February or March. In colder climates, wait until April or even early May. Keep in mind that different rose varieties have unique care requirements, so adjust your approach based on their specific needs.
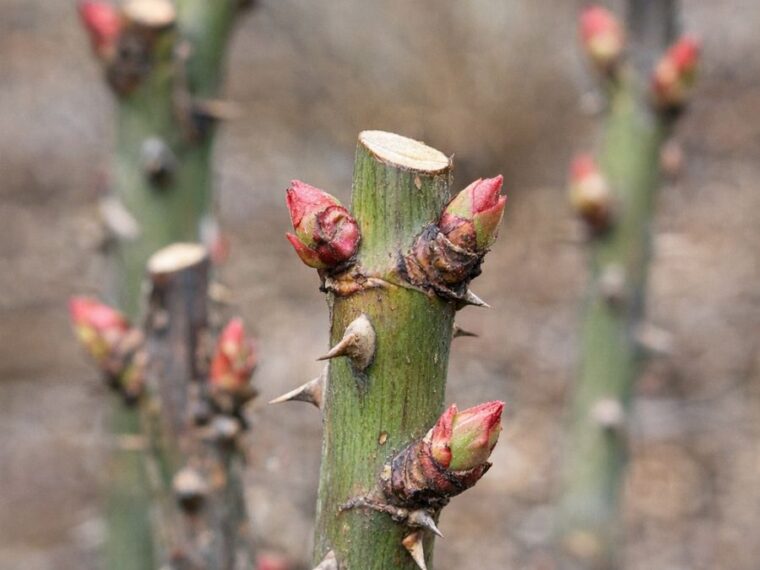
11. Monitor Early Growth and Fine-Tune Care as Buds Break
As your roses begin to break dormancy and new growth appears, continue to monitor their progress. Watch for signs of pests, diseases, or nutrient deficiencies, and address issues promptly.
Adjust your care routine as needed, including watering frequency, fertilizer application, and pest control measures. Regular observation and prompt intervention can make all the difference in achieving a lush, healthy rose garden. By staying attuned to the needs of your roses, you can ensure a successful growing season filled with beautiful blooms.