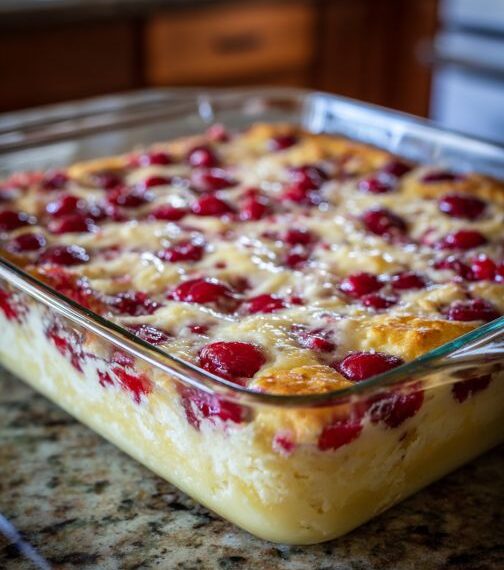
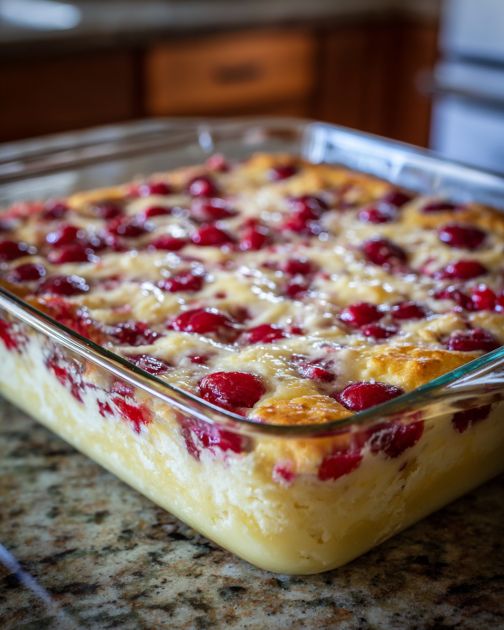
Cherry cheesecake bars feel like every church potluck and family reunion I grew up with here in the Midwest, all wrapped into one pan. They’ve got that classic creamy cheesecake layer, a buttery crust, and sweet cherry pie topping—but with only three ingredients and hardly any fuss. This is the kind of dessert you can throw together on a busy weeknight or when the kids announce at 8 p.m. that they promised to bring a treat to school tomorrow. Baked in two glass dishes, they’re perfect for sharing: one for home and one for a neighbor, a teacher, or the next get-together. It’s simple, cozy baking that still feels special when you set it on the table.
These cherry cheesecake bars are rich and creamy, so they pair nicely with lighter sides. I like to serve them after a simple supper—think grilled chicken, a big green salad, or a pot of soup with crusty bread. For a family gathering, you can set them out alongside a fresh fruit salad or a bowl of berries to balance the sweetness. If you’re serving coffee or tea, these bars make a lovely companion on a dessert tray, and for the kids, a cold glass of milk or hot cocoa turns this into a cozy, end-of-the-day treat. They also travel well, so you can pack them in a cooler for picnics or ball games and slice them right in the dish when you arrive.
3-Ingredient Cherry Cheesecake Bars (Two-Pan Family Style)
Servings: 24 bars
Ingredients
2 (21-ounce) cans cherry pie filling
3 (8-ounce) packages cream cheese, softened
3 (21-ounce) cans ready-made cheesecake or cream cheese pie filling (shelf-stable or refrigerated)
Directions
Prepare the pans: Lightly grease two 8×8-inch or 9×9-inch glass baking dishes (or similar-size glass dishes) with a bit of cooking spray or butter so the bars release easily when sliced.
Soften the cream cheese: Place the cream cheese bricks on the counter for about 30–45 minutes so they soften. This helps everything blend smoothly and keeps the filling nice and creamy.
Blend the cream cheese: In a large mixing bowl, beat the softened cream cheese with a hand mixer (or a sturdy whisk) until smooth and free of lumps. Take a minute to scrape down the sides of the bowl so everything is well combined.
Add the cheesecake pie filling: Pour the ready-made cheesecake or cream cheese pie filling into the bowl with the whipped cream cheese. Beat or stir until the mixture is smooth and uniform. This is your creamy cheesecake layer.
Divide the cheesecake mixture: Evenly divide the cheesecake mixture between the two glass baking dishes. Use a spatula to spread it into an even layer, making sure to reach all the corners so each bar has a good, thick layer of filling.
Chill briefly (optional but helpful): If you have the time, place the dishes in the refrigerator for about 20–30 minutes. This helps the cheesecake layer firm up a bit so the cherries sit nicely on top.
Add the cherry topping: Open the cans of cherry pie filling and spoon them gently over the chilled cheesecake layer in both dishes. Spread the cherries out evenly, trying not to disturb the creamy layer underneath. Make sure every corner gets some cherries so no one ends up with a plain piece.
Chill until set: Cover each glass dish with plastic wrap or a lid and refrigerate for at least 4 hours, or overnight if you can. This helps the bars firm up enough to slice neatly and lets the flavors come together.
Slice and serve: When ready to serve, run a knife around the edges of each dish to loosen the bars. Cut each pan into 12 squares (3 by 4) for a total of 24 bars. Use a small spatula to lift them out, wiping the spatula between cuts if you want especially tidy slices.
Store leftovers: Cover any leftover bars and keep them in the refrigerator for up to 3–4 days. They’re delicious straight from the fridge, and they make an easy make-ahead dessert for busy school nights or weekend company.
Variations & Tips
For picky eaters or kids who don’t love cherries, you can easily swap the cherry pie filling for blueberry, strawberry, or even apple pie filling—just keep the amounts the same. If you want a little more texture, you can press a simple base into the bottom of each glass dish before adding the cheesecake mixture: crush about 3 cups of graham crackers or vanilla wafers, mix with 1/2 cup melted butter, and press it firmly into the bottom of the pans, then proceed with the recipe as written. For a lighter version, you can use reduced-fat cream cheese and a light cheesecake pie filling; the texture will be a bit softer, but still very tasty. If you have a family member who likes things less sweet, serve their bar with a spoonful of plain Greek yogurt on the side to balance the sweetness. To make it feel extra special for holidays, add a sprinkle of mini chocolate chips or shaved chocolate on top of the cherries, or swirl the cherry layer lightly into the cheesecake layer with a knife before chilling for a marbled look. And if your crew likes to help in the kitchen, let kids be in charge of spreading the cherries and decorating the tops—when they help make dessert, they’re usually more excited to eat it together at the table.