Ginger (Zingiber officinale) is one of nature’s most powerful and versatile plants – a kitchen staple, a medicinal marvel, and a natural remedy that has been used for thousands of years.
From calming digestive issues and fighting inflammation to boosting immunity and enhancing circulation, ginger’s health benefits are almost endless.
What many gardeners don’t realize is that growing ginger at home is surprisingly easy, even if you don’t have a large garden or tropical climate.
With just a single piece of ginger root from the store and a little patience, you can cultivate an endless supply of this superfood -right on your windowsill, balcony, or backyard.
Why Grow Your Own Ginger?
Before we get into the how-to, it’s worth understanding why growing ginger at home is worth the effort – and why fresh, homegrown ginger is so much better than store-bought.
1. Superior Flavor and Potency
Freshly harvested ginger is noticeably more aromatic, flavorful, and potent than commercial ginger, which is often dried out, chemically treated, and stored for weeks before reaching your kitchen.
When you grow it yourself, you harvest at the peak of freshness – ensuring maximum essential oils, nutrients, and taste.
2. Healthier and Chemical-Free
Much of the ginger sold in stores is treated with growth inhibitors, pesticides, or preservatives to extend shelf life.
Growing it at home guarantees your ginger is 100% organic, free from harmful chemicals, and rich in beneficial compounds like gingerol, shogaol, and zingerone.
3. Cost-Effective and Self-Sustaining
A single piece of ginger root can multiply into a lifetime supply if grown correctly. Once you start your first plant, you’ll never need to buy ginger again – simply replant a portion of your harvest each year.
4. Easy to Grow Indoors or Outdoors
Ginger is a low-maintenance perennial that thrives in containers, raised beds, or garden beds.
It doesn’t need much space, and with the right conditions, you can grow it indoors year-round – even in colder climates.
5. Endless Culinary and Medicinal Uses
From teas and curries to tinctures, tonics, and natural remedies, ginger is one of the most versatile plants you can grow.
Having a constant supply at home means you can use it fresh in cooking, make homemade wellness drinks, or dry it for herbal powders and spice blends.
Understanding Ginger: A Quick Botany Lesson
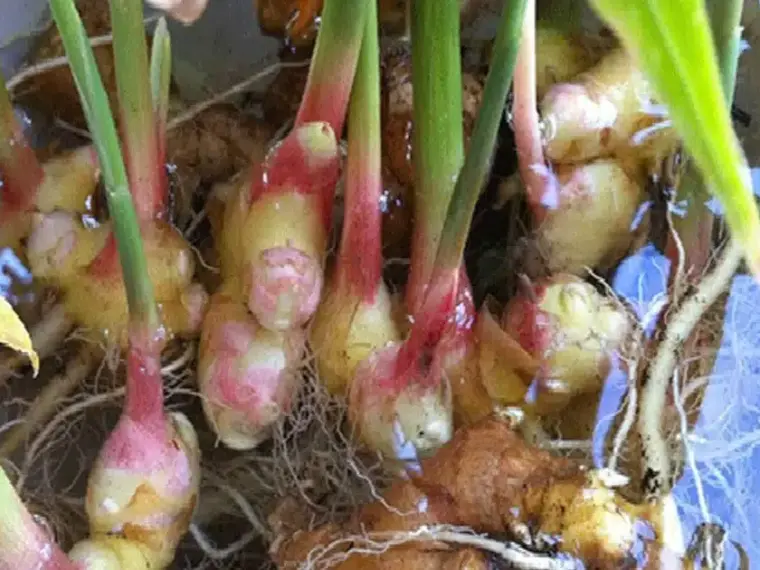
Ginger is a tropical, herbaceous perennial native to Southeast Asia. Unlike many plants, ginger is not grown from seeds – it’s propagated from its underground stem, called a rhizome.
The rhizome stores nutrients and energy, producing new shoots and roots that grow into a full plant.
Here are a few key facts to know before planting:
- Growing time: Ginger takes about 8 to 10 months to fully mature.
- Climate: It prefers warm, humid conditions (20–30°C / 68–86°F) but can be grown indoors in cooler climates.
- Light: Partial shade or filtered sunlight is ideal – too much direct sun can scorch the leaves.
- Soil: Loose, rich, well-draining soil is essential.
- Water: Consistent moisture (not soggy) is key, especially during active growth.
Step 1: Choosing the Right Ginger Rhizome
Your success starts with selecting the right rhizome. Look for:
- Freshness: Choose firm, plump pieces with smooth skin. Avoid shriveled or moldy rhizomes.
- Bud Eyes: Look for small “nubs” or nodes (like the eyes on a potato). These are where new shoots will sprout.
- Organic: Always choose organic ginger if possible. Non-organic ginger is often treated with growth inhibitors that prevent sprouting.
Pro tip: If possible, source fresh rhizomes from a local farmer’s market or an organic grocery store rather than conventional supermarkets.
Step 2: Preparing the Rhizome for Planting
Before planting, your ginger rhizome needs a little prep:
- Soak It: Place the rhizome in warm water for 12–24 hours. This softens the skin and helps awaken dormant buds.
- Cut Into Pieces (Optional): If your rhizome is large, you can cut it into 2–3 inch sections, making sure each piece has at least 2–3 eyes.
- Let It Heal: Allow cut pieces to dry for a day or two. This forms a protective callus and reduces the risk of rot.
Step 3: Choosing the Right Pot or Bed
Ginger grows horizontally, not vertically, so give it room to spread.
- Container Size: Choose a wide, shallow container (at least 12–14 inches deep and 16–20 inches wide).
- Drainage: Ensure the pot has drainage holes – ginger hates waterlogged roots.
- Location: Place the pot in a spot with bright, indirect sunlight (6–8 hours daily).
Step 4: Preparing the Soil
Soil quality is one of the most critical factors for successful ginger growth.
- Texture: Loose, loamy, and well-draining.
- Composition: Mix equal parts compost, garden soil, and sand or perlite.
- pH: Slightly acidic to neutral (6.0–6.8).
- Nutrients: Add aged compost or well-rotted manure for a nutrient boost.
Ginger is a heavy feeder, so nutrient-rich soil is key to strong rhizome development.
Step 5: Planting Ginger
Here’s how to plant your ginger for optimal growth:
- Fill your container or bed with prepared soil, leaving about 2 inches at the top.
- Lay the rhizome pieces horizontally, with the bud eyes facing upward.
- Cover with 1–2 inches of soil – do not bury too deeply.
- Water thoroughly, but avoid soaking the soil.
Step 6: Care and Maintenance for Healthy Growth
Once planted, ginger needs consistent care. It’s a slow grower, but the results are worth the wait.
Watering
- Keep the soil consistently moist but not soggy.
- Water deeply once or twice a week, depending on weather.
- Mist the leaves occasionally to maintain humidity (especially indoors).
Fertilizing
- Feed ginger with a balanced organic fertilizer or compost tea every 3–4 weeks during the growing season.
- As the plant matures, switch to a phosphorus- and potassium-rich fertilizer to encourage rhizome growth.
Mulching
Mulch with straw or shredded leaves to retain moisture, regulate temperature, and prevent weeds.
Light and Temperature
- Ideal temperature: 70–85°F (21–29°C).
- Avoid strong direct sun – filtered light or partial shade is best.
- If indoors, place near a bright window or use a grow light.
Step 7: Watching for Growth Stages
Ginger grows slowly – patience is key. Here’s what to expect:
- Weeks 2–4: Shoots begin emerging from the soil.
- Months 2–3: Leaves grow rapidly; focus on keeping soil moist and nutrient-rich.
- Months 4–8: Rhizomes start to bulk up. Avoid disturbing the soil too much.
- Months 8–10: Ginger reaches maturity and is ready for harvest.
Step 8: Harvesting Fresh Ginger
You can start harvesting baby ginger (mild and tender) after about 4–5 months, or wait 8–10 months for fully mature roots.
How to Harvest:
- Gently dig around the base of the plant with your hands or a trowel.
- Break off a section of rhizome from the main plant.
- Rebury the rest – it will keep growing!
This method allows you to harvest continuously without replanting.
Step 9: Regrowing Ginger Forever
One of the best parts of growing ginger is that you don’t need to start from scratch each year. Simply reserve a few pieces from your harvest and replant them.
- Divide the rhizomes and store them in a cool, dry place until planting season.
- In mild climates, ginger can stay in the ground year-round and regrow naturally.
With this method, you can create a self-sustaining ginger supply that never runs out.
Bonus: Growing Ginger Indoors Year-Round
Even if you live in a cold climate, you can grow ginger indoors all year. Here’s how:
- Place your container near a sunny window or under a grow light.
- Use a humidity tray or mist the plant regularly.
- Keep room temperature above 65°F (18°C).
- Rotate the pot weekly to ensure even growth.
Indoor-grown ginger often produces smaller rhizomes but retains all its medicinal potency and flavor.
10 Ways to Use Your Homegrown Ginger
Once you’ve harvested your ginger, you’ll find endless ways to use it – far beyond just tea or cooking.
1. Ginger Tea for Digestion & Immunity
- Boil fresh slices in water for 10–15 minutes.
- Add honey and lemon for extra immune support.
2. Anti-Inflammatory Ginger Shots
Blend ginger juice with lemon and turmeric for a potent wellness shot.
3. Homemade Ginger Oil
Infuse sliced ginger in olive or coconut oil for 2 weeks – use for massage or cooking.
4. Natural Cold & Flu Remedy
Mix grated ginger with raw honey for a powerful throat soother.
5. Fresh Ginger Paste for Cooking
Blend ginger with a little water or oil and freeze in small cubes for convenience.
6. Ginger Compress for Muscle Pain
Apply a warm ginger poultice to sore joints or muscles for natural relief.
7. Pickled Ginger
Slice thin and pickle with rice vinegar and sugar – perfect for sushi or salads.
8. Herbal Detox Tea
Combine ginger with cinnamon, fennel, and lemon peel for a detoxifying blend.
9. Ginger Steam Inhalation
Add grated ginger to boiling water and inhale the steam for sinus and respiratory relief.
10. Ginger-Infused Bath
Toss a handful of ginger slices into your bathwater for a circulation-boosting soak.
Common Mistakes to Avoid When Growing Ginger
Even though ginger is easy to grow, a few mistakes can hinder growth:
- Overwatering: Causes root rot. Ensure good drainage.
- Planting too deep: Slows sprouting. Keep rhizomes near the surface.
- Too much sun: Burns leaves. Partial shade is best.
- Poor soil: Heavy clay or compacted soil stunts growth.
- Harvesting too early: Wait at least 4 months for baby ginger and 8–10 for mature rhizomes.
Ginger is one of the most rewarding plants you can grow at home – it’s low-maintenance, endlessly useful, and deeply healing.
With just a small piece of rhizome and a bit of care, you can turn a single plant into a self-renewing supply that lasts for years.