A coffee maker is a staple in many households and offices, providing that much-needed caffeine fix to start the day. However, many of us overlook one crucial aspect: the cleanliness of our coffee maker. Over time, coffee makers can accumulate mineral deposits, coffee oils, and even mold, which can affect the taste of your coffee and potentially your health. Ensuring your coffee maker is clean is not just about aesthetic appeal; it’s about maintaining the quality and safety of your brew.
Despite the importance of a clean coffee maker, many people are unsure of how to properly clean theirs. This can lead to a buildup of residues and bacteria that compromise the taste and aroma of your coffee. In this article, we will explore the right way to clean your coffee maker, address common mistakes, and provide tips to keep your coffee machine in top condition.
1. Understanding the Importance of a Clean Coffee Maker
A clean coffee maker is essential for brewing the perfect cup of coffee. Over time, the internal components of your coffee maker can accumulate mineral deposits from water, as well as oils and residues from coffee grounds. These buildups not only affect the taste of your coffee, making it bitter or sour, but they can also harbor bacteria and mold, posing potential health risks.
Regular cleaning can prevent these issues, ensuring that every cup of coffee you brew is fresh and flavorful. According to the National Sanitation Foundation, coffee makers are among the top germiest items in a household. Therefore, maintaining a clean coffee maker is not just about taste; it’s about hygiene and safety.
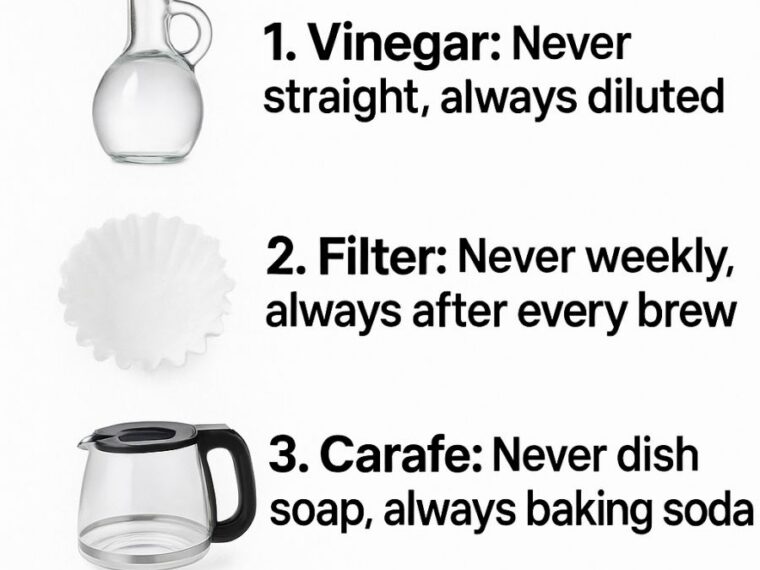
2. The Common Mistakes Everyone Makes
One common mistake people make is not cleaning their coffee maker frequently enough. Many assume that running hot water through the machine is sufficient, but this does not remove all the residues and buildups. Another mistake is using harsh chemicals that can damage the coffee maker or leave harmful residues.
People also often overlook cleaning the individual components of the coffee maker, such as the carafe, filter basket, and water reservoir. Each part of the coffee maker requires attention to ensure a thorough clean. Additionally, using the wrong cleaning agents, such as undiluted vinegar, can result in an overpowering smell and taste that lingers in your coffee.
3. How Often Should You Clean Your Coffee Maker?
The frequency of cleaning your coffee maker depends on how often you use it. Ideally, you should clean the carafe, filter basket, and lid after every use to prevent the buildup of coffee oils and grounds. A deeper clean involving descaling should be done at least once a month to remove mineral deposits from the internal components.
If you use your coffee maker daily, consider a weekly cleaning routine involving all components to prevent any buildup. For those who use their coffee maker less frequently, a monthly deep clean should suffice. Regular cleaning not only ensures better-tasting coffee but also extends the lifespan of your coffee maker.
4. Why You Should Dilute Vinegar for Cleaning
Vinegar is a popular natural cleaning agent due to its acidity, which effectively breaks down mineral deposits and grime. However, using undiluted vinegar can be too harsh for your coffee maker and leave a strong odor. Diluting vinegar with water in a 1:1 ratio is recommended to ensure effective cleaning without damaging your machine or leaving an overpowering smell.
To clean your coffee maker with vinegar, fill the water reservoir with the diluted vinegar solution, run a brewing cycle without coffee, and then follow up with two cycles of plain water to rinse out any vinegar residue. This method helps maintain your coffee maker’s performance and keeps your coffee tasting great.
5. The Best Way to Clean Your Coffee Maker’s Carafe
The carafe can accumulate coffee stains and oils, affecting the taste of your brew. The best way to clean a glass carafe is to fill it with warm water, add a few drops of dish soap, and let it soak for a few minutes. Use a soft sponge or brush to scrub the interior and remove any stubborn stains.
If your carafe has more persistent stains, a mixture of baking soda and water can be used as a gentle abrasive cleaner. Simply sprinkle baking soda on a damp sponge, scrub the carafe, and rinse thoroughly with water. For stainless steel carafes, avoid using abrasive materials that can scratch the surface.
6. Proper Maintenance of Coffee Filters
If you use a reusable coffee filter, it’s important to clean it regularly to prevent the buildup of coffee oils and grounds. After each use, rinse the filter under hot water to remove any remaining coffee particles. For a deeper clean, soak the filter in a solution of equal parts water and vinegar for about 15 minutes, then rinse thoroughly.
Paper filters should be disposed of after each use to avoid any lingering odors or flavors. Regularly replacing filters ensures that your coffee tastes as it should, free from any residual flavors from previous brews.
7. The Secret to a Sparkling Water Tank
The water tank or reservoir can be a breeding ground for bacteria and mold if not cleaned regularly. To clean it, empty the reservoir and fill it with a mixture of equal parts water and vinegar. Let it sit for about 30 minutes to dissolve mineral deposits.
After soaking, scrub the interior with a soft brush or cloth to remove any remaining residue. Rinse the tank thoroughly with water to remove any vinegar taste or smell. Regular cleaning of the water tank ensures that only fresh water is used in your coffee maker, enhancing the overall taste of your coffee.
8. The Right Way to Descale Your Coffee Maker
Descaling is an essential process for removing mineral deposits that can accumulate in the internal components of your coffee maker. To descale, use a commercial descaling solution or a homemade mix of equal parts water and vinegar.
Fill the water reservoir with the solution, run a brewing cycle without coffee, and let the machine sit for about 15 minutes to allow the solution to work its magic. Follow up with two brewing cycles of plain water to rinse out any residual solution. Regular descaling, at least once a month, ensures your coffee maker operates efficiently and prolongs its lifespan.
9. How to Clean Your Coffee Maker’s Exterior
The exterior of your coffee maker can also accumulate dust, coffee splashes, and fingerprints. To clean the exterior, use a damp cloth or sponge with a mild detergent to wipe down all surfaces. Pay attention to buttons, seams, and any other areas where dirt might accumulate.
For stainless steel exteriors, consider using a stainless steel cleaner to maintain a polished look. Avoid using abrasive materials or harsh chemicals that could damage the finish. Regular cleaning of the exterior not only keeps your coffee maker looking new but also ensures a hygienic brewing environment.
10. Viral Hacks That Actually Work
Several viral cleaning hacks have gained popularity, such as using baking soda or lemon juice for a natural clean. Baking soda can be used as a mild abrasive to clean the carafe or remove stains from the exterior. Simply make a paste with water and scrub the stained areas.
Lemon juice, with its natural acidity, can be used as an alternative to vinegar for descaling. Mix equal parts lemon juice and water, and run it through your coffee maker to remove mineral deposits. These hacks provide effective, natural cleaning solutions that can complement your regular cleaning routine.
11. Preventive Tips for Keeping Your Coffee Maker Clean
One of the best ways to keep your coffee maker clean is through preventive measures. Always use filtered water to reduce mineral buildup in the machine. Empty the carafe and clean it along with the filter basket after each use to prevent coffee stains and odors.
Store your coffee maker in a cool, dry place to prevent mold growth, and regularly inspect all parts for signs of wear or damage. By incorporating these preventive tips into your routine, you can ensure that your coffee maker remains clean and in optimal working condition, providing you with delicious coffee every time.