Imagine stepping into your garden and harvesting a handful of fragrant herbs – thyme, basil, rosemary – right from a single, stunning centerpiece.
That’s the beauty of an herb spiral, a permaculture-inspired vertical garden design that makes growing herbs both practical and beautiful.
Whether you’re short on space or seeking a unique garden feature, an herb spiral is a brilliant solution.
What Is An Herb Spiral?
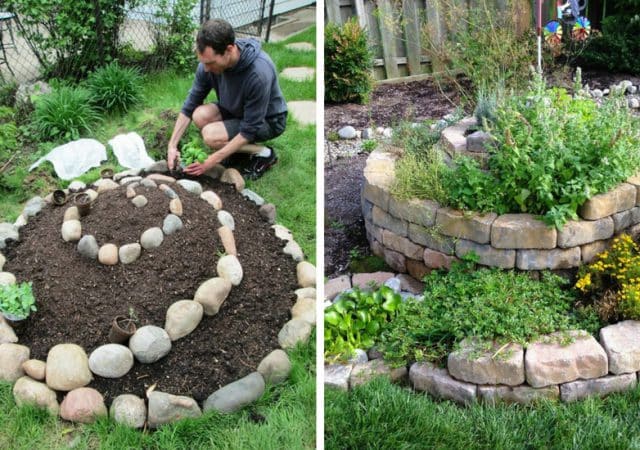
An herb spiral is a spiral-shaped raised bed, usually constructed from stone, brick, or other durable materials, that winds upward like a snail shell.
The design creates microclimates, using height and orientation to offer different sun, shade, moisture, and drainage zones – all in one compact footprint.
It’s a classic permaculture technique that makes smart use of vertical space and mimics natural landscapes to support diverse plant life.
8 Reasons To Create An Herb Spiral
1. Efficient Use of Space
One of the biggest challenges for gardeners is space – especially urban gardeners or those working with patios and small yards.
An herb spiral transforms a small horizontal footprint into multiple layers of planting area. A typical spiral just 3-6 feet wide provides enough room to grow dozens of herb varieties.
Instead of scattering herbs across separate beds, you concentrate them vertically, freeing up ground space for other crops.
Bonus: The height makes harvesting easier, so no more bending over for every sprig of parsley!
2. Diverse Microclimates in One Bed
This is where the herb spiral truly shines.
- Top of the Spiral: Hot, sunny, and well-drained. Perfect for Mediterranean herbs like rosemary, oregano, and thyme.
- Middle Zones: Moderate moisture and sun levels, suitable for herbs like sage, chives, or coriander.
- Base of the Spiral: Shadier and moister, ideal for parsley, mint, and basil.
By creating these zones, you can grow a wider variety of herbs than you’d manage in a flat bed with uniform conditions.
3. Improved Drainage
Excess water can be devastating for herbs that prefer dry conditions. In an herb spiral, water naturally trickles downward through the soil layers.
The top remains well-drained, while the base retains more moisture—a perfect match for different herbs’ needs.
This natural water distribution means less overwatering and fewer issues with root rot.
4. Aesthetically Beautiful Garden Feature
An herb spiral isn’t just practical – it’s stunning. Whether crafted from rustic stone, modern brick, or reclaimed materials, the spiral shape is a living sculpture in your yard.
It creates a focal point, adding visual interest and texture to gardens of any size. It’s a talking point for visitors and a lovely way to showcase your gardening creativity.
5. Supports Pollinators and Biodiversity
Many herbs produce flowers that attract pollinators like bees, butterflies, and beneficial insects.
By planting a variety of herbs together in a spiral, you’re creating a mini ecosystem that supports local wildlife.
Beneficial insects help keep pest populations in check, reducing the need for chemical interventions and promoting a healthier garden overall.
6. Convenient Harvesting
An herb spiral places your herbs within easy reach. The spiral design brings plants closer to eye level as it rises, making it easier to snip herbs while cooking or gardening.
Having diverse herbs in one spot simplifies watering, fertilizing, and maintenance. It’s a one-stop shop for fresh herbs whenever you need them.
7. Conserves Water
Herb spirals are more water-efficient than traditional beds.
Because of their vertical structure and smart design, they:
- Capture and retain rainwater
- Reduce evaporation
- Direct excess water to thirstier plants at the spiral’s base
This makes herb spirals excellent for drought-prone areas or gardeners looking to save water.
8. Encourages Sustainable Gardening
Building an herb spiral embodies the principles of permaculture – working with nature rather than against it.
You recycle materials like stones or bricks, conserve water, and create habitat for wildlife.
It’s a sustainable way to produce food, reduce waste, and connect more deeply with your garden’s natural rhythms.
How To Build An Herb Spiral
Ready to build your own herb spiral? Here’s a step-by-step guide to help you create this garden masterpiece.
Step 1: Choose Your Location
Pick a sunny spot, ideally receiving at least 6-8 hours of sunlight daily. Flat ground works best, but you can adjust the spiral to slope gently if needed.
Ensure the area has good drainage. Avoid low spots that collect standing water.
Step 2: Gather Materials
Here’s what you’ll need:
- Edging Materials: Stone, brick, recycled concrete, logs, or even bottles.
- Soil: A blend of garden soil, compost, and sand for good drainage.
- Cardboard or Newspaper: To suppress weeds.
- Optional Mulch: For finishing the top.
Materials can be rustic or modern – match your garden’s style!
Step 3: Outline Your Spiral
Use a hose, rope, or string to lay out your spiral shape on the ground. A typical spiral is about 3-6 feet in diameter and rises to about 2-3 feet high in the center.
Start wide at the base and gradually narrow the spiral as it rises.
Step 4: Prepare the Base
- Remove grass or weeds from the spiral area.
- Lay down a thick layer of cardboard or newspaper to block new weeds from emerging.
- Moisten the cardboard so it stays in place.
Step 5: Build the Spiral Walls
Start stacking your chosen materials along the spiral’s edge, forming the walls.
As you build:
- Keep the walls higher in the center.
- Taper down as you spiral outward.
For stones or bricks, stagger seams for stability. Aim for a gentle slope so water will naturally flow down the spiral.
Step 6: Fill With Soil
Layer in your soil mixture:
- Top zone: Add more sand for excellent drainage.
- Middle zone: Use standard garden soil with compost.
- Lower zone: Include more organic matter for moisture retention.
Don’t pack soil too tightly. You want good aeration for healthy roots.
Step 7: Plant Your Herbs
Now the fun part – planting!
Here’s a quick guide for herb placement:
Top Tier (Dry, Sunny)
- Rosemary
- Thyme
- Oregano
- Lavender
Middle Tier (Moderate)
- Sage
- Chives
- Dill
- Cilantro
Lower Tier (Moist, Shady)
- Parsley
- Mint (in pots to contain spreading)
- Basil
- Lemon balm
Plant the taller herbs toward the top or center to avoid shading smaller herbs below.
Step 8: Water and Mulch
Water the spiral thoroughly after planting. Add mulch around your herbs to:
- Retain moisture
- Suppress weeds
- Keep soil cool
Monitor moisture levels, especially in the top zone which dries out faster.
Additional Tips for Success
- Rotate plantings each year to keep soil healthy.
- Regularly prune herbs to encourage new growth.
- Keep invasive herbs like mint contained in pots buried in the spiral.
- Harvest frequently to keep herbs productive and lush.
An herb spiral isn’t just a beautiful garden feature – it’s a practical, efficient, and sustainable way to grow a diverse range of herbs.
From saving space to conserving water, the benefits are plentiful.
Start small if you’re unsure, or go bold and create a spiral that becomes the centerpiece of your garden.